Cheddar Almond Crackers / Grain free crust

This is a remarkably fast, easy and versatile recipe using cheddar cheese and almond flour. You can make grain free crust (for pizza or savory pies), crackers, & biscuits.

The first time, I used Bob’s Red Mill almond flour and a sharp yellow cheddar. I rolled the dough into a flat, compressed sheet, and got a Cheezit-style cracker.

The second time, I tried a coarser almond meal (from Know Thy Food’s bulk bin) and a mild cheese. I threw in some rosemary, and didn’t roll them as heavily, and they made sort of a cross between a cracker and rustic biscuit. I found an identical recipe online that called for dropping fluffy dough balls onto a cookie sheet to make biscuits reminiscent of Red Lobster’s Cheddar Bay Death Traps… but of course a much healthier version. I need to try that!


grain free crust and crackers

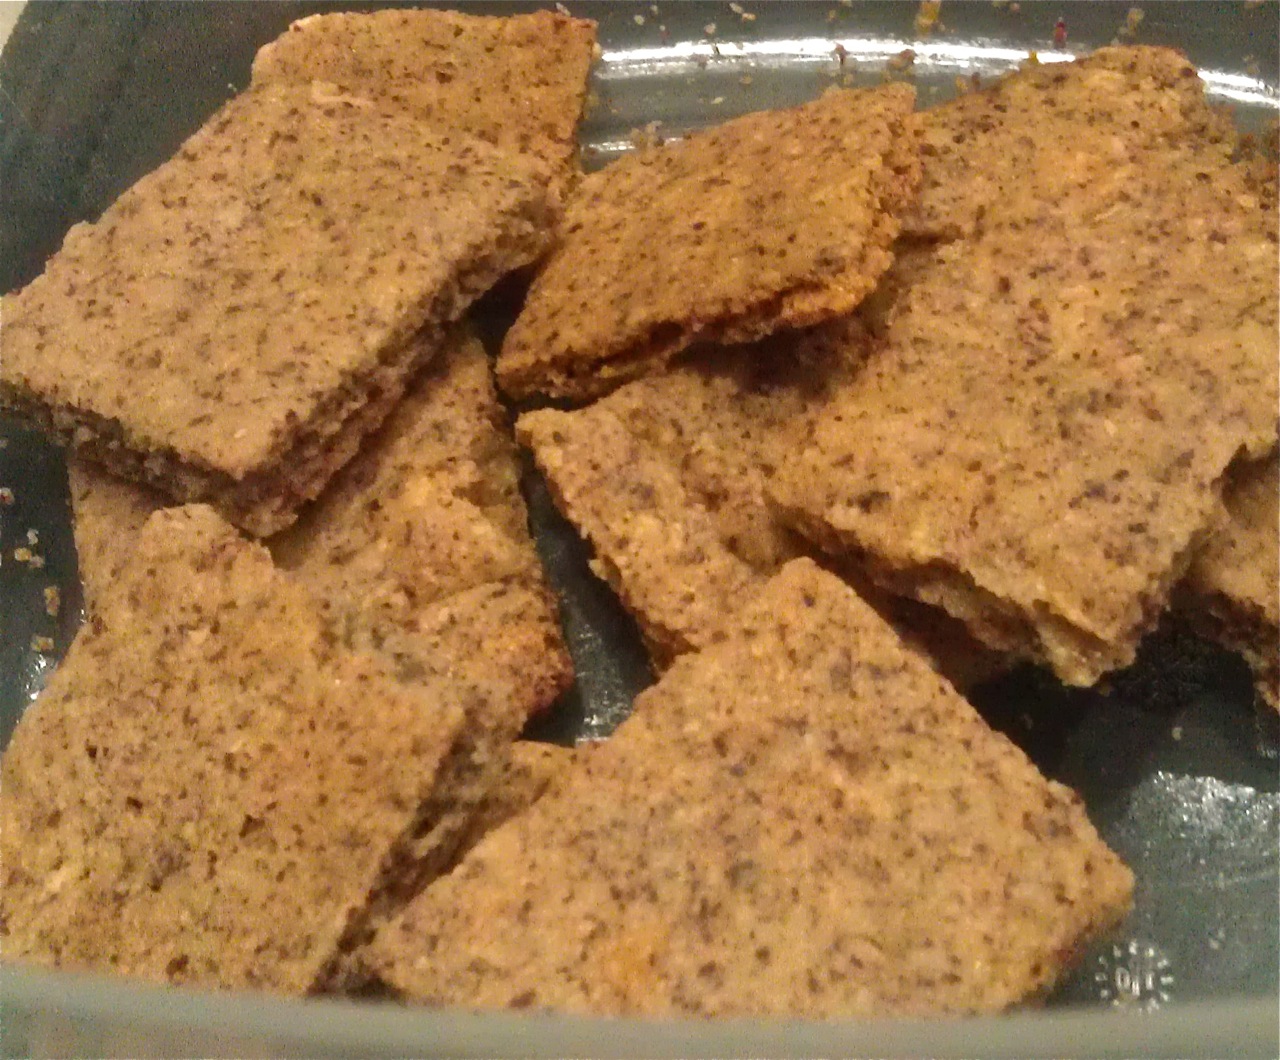
Rustic rosemary crackers: These were so stupendously satisfying and filling we dubbed them “Lembas Bread.”

These are by no means low-calorie, but they are higher in protein than regular crackers and are fine for the occasional indulgence. I plan to use this recipe for a savory grain free crust when I make beef & spinach pies for LARP this weekend. Come back for an update on how that went next week!

Cheese Crackers with Almond Flour (Gluten Free)
Modified from The Gluten-Free Almond Flour Cookbook by Elena Amsterdam. This recipe is half the amount in the book, so double it and make the full recipe if you prefer.

1 1/4 cup blanched almond flour
1/8 tsp. sea salt
1/4 tsp. baking soda
1/2 cup freshly grated cheddar cheese, lightly packed into measuring cup
1 1/2 Tbs extra-virgin olive oil
1 large egg

Preheat oven to 350F/175C.
In a medium-sized bowl, combine almond flour, salt, baking soda and cheese. In a smaller bowl, whisk together the egg and oil. Pour the egg mixture into the dry ingredients and stir until well-combined.

For crackers: Cut two pieces of parchment paper the size of your baking sheet. Put one piece of parchment on cutting board and put dough on top. Put the second piece of parchment on top of the dough and roll out with rolling pin (or wine bottle!) until dough covers the parchment sheet. Roll it out the same thickness or the thinner pieces will burn.
Remove top parchment and cut dough into pieces 2 inches square. A pizza cutter works beautifully for this if you have one.
Slide the parchment with the cut dough onto baking sheet and bake crackers 12-15
minutes, or until lightly browned.
Let crackers cool on the baking sheet for 30 minutes.

For biscuits: Butter your cookie sheet, or use a sheet of parchment paper. Drop small clumps of dough, about the size of a golf ball. Do not press or form them – let them stay fluffy and uneven.

Come up with alternate ways to use / modify this recipe? Let me know!

UPDATE 4/22/13: The meat pies were a hit! The insides were Vidalia onion, grass-fed beef, kale, fresh herb mix from Freddies, egg (3 for 2 pies), garlic, tumeric, salt, and pepper. I meant to add cubed carrots or parsnips, but I forgot.

"Adventurer Pie" with a grain free crust

“Adventurer Pie” with a grain free crust!

UPDATE 7/26/13: I have been using same recipe for a grain free crust for pizza. A double batch of the crust is the right amount to cover a cookie sheet. I use a second layer of parchment paper and a can of beans as a rolling pin to get it the same thickness all over. Top it with pesto sauce (no nightshades for me), salami, and cheese. Or try chicken, spinach, and mushrooms! Yum!!

Bone Broth Kale Soup (aka LARP soup)

Here’s the short version:

Okay, so these are not, strictly speaking, recipes. They are more of a set of guidelines, really. Feel free to experiment: That’s how these were born. I needed some nutrient-dense food that I could take into the woods for a weekend of LARPing (Live Action Role Play – improv acting meets D&D, aka exercise in costume), so I developed stuff that could travel and store well. I will be using these for busy work weeks, too!

LARP Soup: First we start with…

Bone Broth: This is amazing stuff. Use it as a base for any kind of soup! Since I started making it, my nails have gotten crazy strong. It’s terrific to build immunity, too.

CIMG0427

More detail: 

I like beef, and ideally I get grass-fed /organic bones, but I have to admit sometimes I just use the ones at Fred Meyer. Also, if I make a whole chicken or have wings, I save the bones in the freezer until I’m ready to make broth.

Throw as many as will fit into a crockpot, with a little splash of vinegar (that helps suck out the nutrients). Optional: an onion (sliced in big chunks) or carrots for flavoring. I keep a ziplock in my freezer to hold rinds from hard cheeses, veggie scraps, etc, and empty it into my next batch to deepen the flavor. I have done both fancy ones with everything in, and plain bones-&-vinegar. Use whatever you have. Add enough water to cover the bones. Set the crockpot to low. In a few hours, your house will smell amazing! If you like, add a bay leaf or two in the last few hours of cooking, not a whole bunch at the beginning as pictured here. This batch turned out too bitter. Bleech.

If you accidentally use too much vinegar, and your broth is sour, turn it into sweet & sour (or hot & sour, if you can tolerate nightshades) soup with a Chinese flavor profile. Google has a ton of recipes available.

CIMG0430

After 24-36 hrs (or AN HOUR & A HALF, using an Instant Pot), use a slotted spoon to remove the bones and cooked-into-oblivion veggies. There will be a layer of oil on the surface. Do NOT attempt to “taste” the broth from that. It will not be a pleasant experience, trust me. Instead, pour all the liquid into a soup pot and put it in the fridge. When you come back to it, an hour or a day later, the fat on top will have congealed into a hard, white disc. Crack it like ice and peel the fat away from the gelatinous goodness underneath. You can save the fat for later use (it makes really tasty scrambled eggs) if you are into that sort of thing, or just chuck it. You can heat the bone broth and enjoy as is, or with a few add-ins like garlic or pepper.

Cooled broth

If you want to continue to LARP soup, put your soup pot containing the freaky-looking beef jello on the stove, medium heat. Toss in kale, sliced mushrooms, carrots, yams, parsnips… whatever you like! I love adding natural bacon (cooked separately, first). Trader Joe’s has a great chicken sausage that works beautifully, too. Time your additions so veggies go in first, then meats, then pre-cooked meats. Don’t forget fresh crushed garlic, grated ginger, or any other favorite herbs along with salt, pepper, etc. When the kale is limp and dark, you are done! Remove from heat, serve, and bask in the praise of your loved ones. This freezes beautifully for reheating later. If that’s your plan, take it off the heat a little earlier.

It looks (and smells!) better in person, trust me!

Enjoy!

PS – See my Instant Pot post for a secret weapon that makes getting the solids out of your broth quick and easy!

Healthy carrot “muffins”

Here’s what they look like with crushed walnuts sprinkled on top. Don’t forget to butter the muffin tin before pouring in the batter!

These high-protein, non-grain, low-sugar muffins look, taste, and smell great, and even the texture is terrific! I altered them from a previously existing recipe, which is why there are actual amounts. :)

1 cup almond flour
2 scoops vanilla protein powder
2 tsp cinnamon
1/2 tsp baking soda
1/4 tsp sea salt
1/4 tsp ground allspice
1/2 tsp ground nutmeg

1/4 tsp ground ginger
2 tbsp flax seeds
1/2 tbsp vanilla extract
4 egg whites
8 oz pureed carrots
a squeeze of honey

NOTE: This resulted in essentially non-sweet muffins. Enjoy them straight up, decorate them with honey and butter when you reheat them, or  add sweetener (honey, stevia, etc.)  to the ingredients list if you must.

Pre-heat oven to 350 degrees and butter your muffin tins. Mix dry ingredients first, in a medium size bowl. In a smaller bowl, whisk the moist ingredients. Slowly pour the wet into the dry mixture. You don’t want to over mix or your muffins won’t rise as much. Using a 1/4 cup, scoop batter into each tin. Bake for 12-15 minutes, or until toothpick comes out clean. Set aside for 15 minutes or until cool.

PS – My buddy Q says these are great cold. She also recommends adding coconut. Yum!